Monday, December 19, 2011

Sneak-A-Peek: Rock The Block!!

What better to sneak a lil' peek at what the Spring/Summer 2012 catalog has in store for you? The campaign that runs through Dec 19, 2011 to Jan 31, 2012 features the product 'Collage Cubes'. It's a really neat little product that gives you more than just one side to show off your awesome photos!


 When you order $25.00 CAD worth of product from the current Autumn/Winter catalogue, you can get these two neat products for only $15.00 more! The E-sized stamp set included in this promotion is only available during this time and is not available in the Spring/Summer 2012 catalogue.


As well, I'm excited to tell you that the Canadian 2012 pricing matches the US dollar for dollar! That means that you'll be able to purchase more stamps at lower prices. The adjustment will be in effect Jan 1, 2012 - so to get a heads up on pricing refer to the US version of your Idea Books online.

And last, but not least, this may be my final post of the year before next year rolls around, so I'd like to thank all of my readers for following along with my crafts. Merry Christmas and see you all in 2012!!

Friday, December 16, 2011

Christmas Cheer at the office

In the two different jobs I have been at - past and present - it has led me to be really grateful to work with a team which not only genuinely cares about you like you were family, but respects your choices without judgement and believes in you to get things done.

As a female software developer, I often end up being the lone lady among a pack of males. Which makes it very important to have the right team, or you end up very miserable. Not only have the boys been very good to me, they have also guided and mentored me over the last many months, and I wanted to say thank you and bring Christmas into the office for our little team.


Thank you to a very amazing hubby who gifted me (early) with a Cricut for Christmas! Using the Art Philosophy cartridge in the E2 alongside the Wonderland paper pack, I came up with pillboxes which I stuffed with four chocolate pieces. Note to self - using tape runners does not mean they will stick together; arm yourself with a very trusty glue gun.

My favorite part about these boxes is that the brown dotted paper is literally the other side of the blue diamond pattern - don't they go so well together?


The tags were also cut with the Art Philosophy cartridge - first I cut the recommended size on the stamp sheet, and then I cut a slightly larger tag (and for the smaller one, I lopped off the handle). Any stamp set that has a corresponding shape to the Art Philosophy cartridge also has a recommended size printed right on the sheet! Sooo handy!


And finally, I decided to add blue ribbon to finish off the look. Each packet actually had names written on them but those were edited out. The interesting thing is that you could just change up the colors of the papers and the stamp tags to something else and you could end up with party favors!

These were paired with handmade cards and were a hit.

Michaels:
* Cardstock: "Primary"
* Blue ribbon

CTMH:
* Wonderland Level 2 Paper Packet
* December 25
* Art Philosophy Cricut Cartridge
* Spring Iris Ink

Have you bought your turkey for Christmas yet?

Friday, December 9, 2011

Tree's up..

.. and tomorrow is our annual Xmas potluck that we have for a few close friends we see a few times a year. I can't believe that December is flying by so fast.

Today's inspiration is from Mojo Monday : MOJO218. I absolutely adore their layouts.


It`s really easy to make your own card bases! A tip from Wishes is to simply take a 8 1/2 x 11 piece of paper, cut it in half to make two 5 1/2 x 8 1/2 pieces, and score straight down the middle. What's even better is that my local stationery store happens to sell matching sized envelopes; $12 for 100.

As you can see I couldn't resist using Liquid Applique to give my little inked Santa a bit more oomph on the front of the card, and dressed the card up with a bowtie and some little sparklies.


I always love matching up the colors on the inside of the card with the outside. I've also noticed a change in quality of the photos taken - in previous posts, they were done with a Canon point and shoot; these two photos were taken with a Canon Rebel XT aided with a Canon Speedlite 430 EX.

Michaels:
* Cardstock - "Primary"
* Rhinestones

CTMH:
* Mistletoe Level 2 Paper Pack (retired)
* Wonderland Level 2 Paper Pack
* Christmas Cheer
* Christmas Love
* A Timber
* Festive Thoughts
* Ponderosa Pine Ink
* Cranberry Ink
* Chocolate Ink

It smells like Christmas here,

Sunday, December 4, 2011

Wishes - Greeting Card Workshop

Jeanette Lynton has published two amazing books for cardmaking : Originals and Wishes. These books contain awesome layouts, tips and tricks, recipes on how to make them, and even printable templates on a CD! You can't get any better than that.

I thought I'd try out one of the card workshops in Wishes - Greeting Card Workshop found on page 111. These workshops make 16 standard 5 1/2 x 4 1/4 cards. It took me a total of three hours to finish the workshop, but most of the time was spent cutting. On average, the cards you see in my posts are an hour to make or more including fiddling, color coordination, and cutting/stamping/assembly.

I ended up with 16 beautiful cards which are much simpler than my usual style. I couldn't resist using foam squares though.


The biggest tip of all is: "keep it affordable by stamping your embellishments instead of using consumable accents". It's a great tip for those just starting out.

3 sheets of 12 x 12 paper and 9 pieces of 8 1/2 x 11 white paper for cardstock... plus additional embellishments and a few stamp sets later and voila!

Michaels:
* Cardstock, "White"
* Green cardstock
* Cardstock, "Gems" collection

CTMH:
* Holiday Warmth - October 2009 Stamp of the Month, retired
* Snowflakes
* Festive Thoughts
* Holiday Commentary
* Mistletoe Level 2 Paper Pack - retired
* Snow Flurries
* Bundled Buddies
* Cranberry Ink
* Ponderosa Pine Ink
* Art Philosophy Cricut cartridge

Christmas is fast approaching! P.S ... did you see the card I made with Mad About You (Dec 2011 SOTM) in the previous post?

Thursday, December 1, 2011

Hearts, Christmas and Valentine's Day

Can you believe it's December already? I can't... the year has just seemed to fly by! But there is snow on the driveway, Christmas lights are up around the neighbourhood and the local grocery stores are now sporting real Christmas trees for sale.


With a qualifying total purchase of $55.00 CAD this beautiful set - Mad About You - could be yours for only $5.50! This set is totally versatile for Christmas (hearts), Valentine's Day, and of course wedding cards.
I only managed to get around to doing one this weekend, but it features all the prettiest parts about this set - hearts! Today's inspiration is an older Mojo Monday from April 2011: MOJO185.


You can just barely see them but the three brads on the left hand side are hidden in the ribbon bow's shadow. This card just proves that the Wonderland paper bundle from the Autumn / Winter 2011 CTMH collection doesn't have to be just for Christmas cards! The big heart and the sentiment are from Soul Mates to augment the hearts from the stamp of the month.

On December 19 the constant campaign will start which includes one Sneak-A-Peek product from the Spring/Summer 2012 catalog - Collage Cubes. I'll post more about it then!

Michaels:
* Cardstock
* Ribbon
* Brads
* Edge punch

CTMH:
Mad About You - December 2011 Stamp of the Month
Soul Mates
Now and Forever
Cranberry Ink
Chocolate Ink


Tuesday, November 29, 2011

I did it!!

Two and a half weeks later, I have created 40 cards for my girlfriend to sell for Ryan's Well! I just need to package them now and hand them off to her. Plus, I am super excited; my man got his Macbook Air early for Xmas (thanks, Black Friday) and he is returning the favor with a Cricut E2! I am so lucky to be living with such a supportive husband!

With the completion of the Ryan's Well project behind me, I am back to creating Christmas cards for friends and family. Today's inspiration is another Mojo Monday layout: MOJO217.


Once in a while I like to walk into Michaels and see what they have for my stash. As such, I chanced upon these cute little blue rhinestone stars, and I just couldn't resist. They ended up being the perfect tree topper! Strangely enough I was missing my blending pen, so I took a paintbrush and used that to paint up my little reindeer.

I can't believe that on Thursday it is already December... do you have your Christmas lights up yet?

Michaels/Dollar Store:
* Rhinestone star
* Ribbon
* Embroidery Thread
* Buttons
* Cardstock from "Primary" set

CTMH:
* Bundled Buddies
* Wonderland Level 2 Paper Pack
* Blue & Green Assortment Sparkles
* Liquid Applique
* Olive Ink
* Ponderosa Pine Ink
* Chocolate Ink
* Spring Iris Ink
* Moonstruck Ink


Sunday, November 20, 2011

A simple thanks...

... I don't have any  new cards to post for you today - by Friday I had finally managed to cut all the little pieces for the four cards, 10 cards each (40 cards) and last night I had assembled 10, 30 to go. I hope these cards help out my friend's charity greatly.

Thank you to Kelley and Nancy for already ordering two sets! You rock my world! 8 left to sell...

Today is a small card that I had tacked onto a client's first order back in the fall. We had chatted about making cards over lunch one day, and then I invited her over for a playdate. (shhh... if you're a crafter you're never too old for one) and she was hooked. Plus, perhaps this will inspire her for further cards along the line.


This was inspired by one of the layouts from Jeannette Lynton's book Wishes, but I can't remember which one.

The background square is from an old set of brick stamps I bought to do my wedding thank you cards back in '08 and the rest of the stamps plus that little strip of paper at the bottom is CTMH. After all, sometimes the simplest cards can speak the largest volumes.

Michaels:
* Cardstock, my stash
* Cardstock, "Spice Market"

CTMH:
* Mistletoe Level 2 Paper Pack (retired)
* Dream Big
* Cherished Flourishes

Stay warm,

Saturday, November 12, 2011

Ryan's Well - Charitable Contribution

In discussion last week a friend of mine was wondering if I could donate my time and some handmade goods. She is championing the cause of Ryan's Well, and was I interested in donating my time and some cards for her to sell towards raising funds for this? Of course.

For those of you who are not familiar with Ryan's Well, it all started with a 7 year old boy who was moved to help those who did not have access to clean water to drink. He got to work and soon had the first well built in 1999 at a school in a Ugandan village. To this day, his foundation continues to bring clean water and sanitation to those impacted by the global water and sanitation crisis. Can you imagine  not having clean water? It's one of the most basic necessities of life. To learn more, click on http://www.ryanswell.ca/

So, I will be having her over tomorrow for a day of gossiping, laughter, homemade pizza and wine along with creating 10 sets of four handmade Christmas cards for sale. They are below:

The left photo is how they will look before going into a Ziploc bag and the right is all the cards that make up a set. Thanks to the following blogs and sketches for inspiration: SplitcoastStampers.com : VLVNov2011; Random Acts of Creativity : Challenge #36; Heart 2 Heart Close To My Heart Challenge Blog : H2H76; and finally, Mojo Monday : MOJO 214


I elected to keep this one simple using the layout from  Heart 2 Heart Close To My Heart Challenge Blog. The technique featured here is paper ribbons; I fold them to get a neat accordion effect and I put a dollop of CTMH's silver sparkle gel to make it look like brads. The circles are raised up and I added a rhinestone to the middle of each. CTMH's Art Philosophy cartridge has a corresponding shape to the circles from the set December 25, but I'm hoping for a Cricut for Xmas and thus they were hand-cut.


The biggest challenge for me was to keep it to cardstock and stamps. It was a self imposed challenge to see if I could break away from the dependency on pattern cardstock. I wanted to showcase the different layers here, and the blue border was punched with a EK snowflake edger punch from Michael's. This one was from Random Acts of Creativity 's template, but instead of a big bow I opted for a tiny green tie.


I dressed up the red piece with a Merry Christmas sentiment. Using the layout from Mojo Monday - MOJO214 instead of a flower I stacked three different ornaments from the set Holiday Cheer.with mounting foam tape. It's a bit slimmer than the usual foam squares. And finally, to highlight the snow I used Liquid Applique to outline the roofs and snow in the trees, then embossed it for a poofy look.


This last one from SplitcoastStampers.com highlights one of the major perks about working with acrylic stamps: you can bend them (but be gentle!) to follow curves and other funky shapes depending on what you're stamping on. I again lifted up the three ornaments from the set December 25 and curved the love-hope-peace sentiment from Snow Flurries. The blue snowflake that was cut out again by hand is better done with the corresponding shape in the Art Philosophy Cartridge.

I hope these four cards are charming enough to bring in some $$ for Ryan's Well - wish my friend luck!

Michaels:
* Mounting foam tape
* Cardstock from 'Spice Market'
* Cardstock from 'Gems'
* Cardstock from 'Primary"
* Rhinestones

CTMH:
* Snowflakes
* You and Me
* A Sip
* Pair A Phrase
* Festive Thoughts
* Holiday Cheer
* Snow Days
* December 25th
* Snow Flurries
* Silver Glitter Gel
* Liquid Applique
* Chocolate Ink
* Cranberry Ink
* Moonstruck Ink
* Ponderosa Pine Ink
* Olive Ink


Sunday, November 6, 2011

You and Me Themed 2012 Calendar

This was a unique challenge for me. I wanted to stay solely with the colors that were in the You and Me Kit: Creme Brulee, Olive, Smoothie, Garden Green, and Chocolate which meant that I did not have free reign with colors like I normally have. However, I didn't mind; it was actually less stressful to work with four colors (I did not end up purchasing the Creme Brulee ink) and it came out looking fantastic.


As you can see I ended up using You and Me patterned cardstock for the front and back only. The rest of the inside pages were the brownish/cream colored cardstock from Michael's Spice Market cardstock and the quote pages were white cardstock that I distressed with chocolate ink.


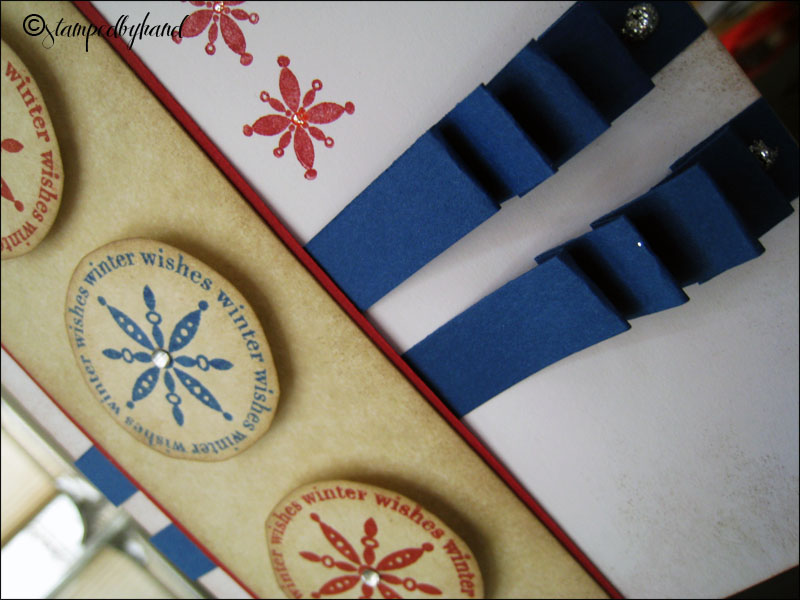
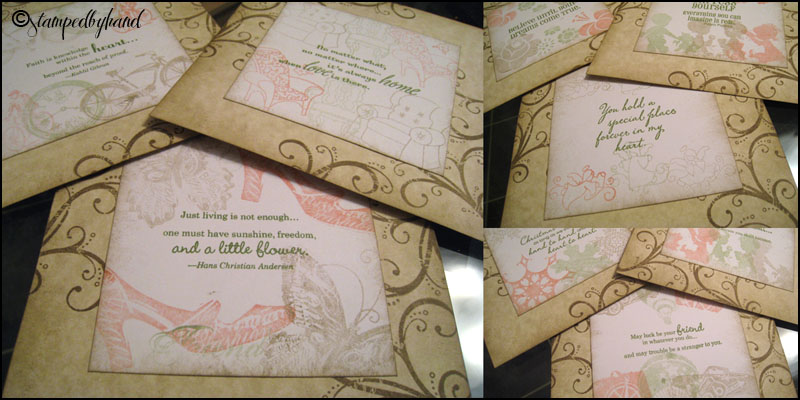
Each of the stamped corners on both sides were done with the curly stamp from You and Me, three times per corner and then all squares were distressed with chocolate ink. I thought it would be lovely to have a little quotation on the back of each square. Each quotation is matched with some "pictures" of course, all second generation stamping. In the case of September and December, the months actually span over six weeks so I needed to do some masking in order to stretch the weeks.

I wish I could keep this calendar for myself as it came out looking so gorgeous but it is a present that I'm sure my Mom will love this year for Christmas. I am glad that this project is done - I can finally put all my stuff away properly :) but no shortage of stamp sets were used.

All in all this being my first time, I will definetly use the My Creations chipboard items again. Next time I will be using their triangle banner.

Michaels:
* Cardstock from 'Spice Market' set

CTMH:
* You and Me Kit
* Creme Brulee, Smoothie, Olive, Garden Green cardstock from Autumn set
* Bohemian Alphabet
* Classmate Alphabet
* Month By Month
* Enjoy Life
* Find Your Style - Jan 2011 Stamp of the Month
* Horizons
* Chairs To You - April 2011 Stamp of the Month
* Pair-A-Phrase - August Constant Campaign
* Angel Sent
* Sensational Season - March 2011 Stamp of the Month
* Wings Workshop kit stamp - retired
* Dreams Come True
* Baby Love
* Snowflakes
* Wonderful Friend - retired
* Olive Ink
* Chocolate Ink
* Garden Green Ink
* Sorbet Ink

Friday, November 4, 2011

Stitching on cards

In one of my previous orders I had purchased the awesome new ruler from CTMH. It has holes in it so first you pierce where the holes are, then you sew through them! How cool is that? So I thought I'd do that for this card.

The inspiration comes from Mojo Monday: MOJO 212.


Not only did I use the same floss for stitching, I also used it for the ribbon on the front. However, the threading is two strands and the cross ribbon is all six. The snowflake is from a set of Xmas buttons that I found at Michaels' while walking through. All their Xmas stuff is now out for sale.


The inside of the card was stamped with two shades of green and using the second generation stamping technique. After inking, stamp a good image on scrap paper, then without reinking stamp on your project again. Between that and the different shades of green, my second snowflake stood out really well.

Michaels:
* Cardstock from "Gems" set
* Cardstock from "Spice Market" set

CTMH:
* Snow Flurries
* Snow Flakes
* A Timber
* Holiday Cheer
* Bitty Rhinestones
* Olive Ink
* Cranberry Ink
* Honey Ink
* Piercing Kit
* Ruler

Happy Stamping,

Wednesday, November 2, 2011

Come drink my rum... and Cherish the Day Nov SOTM

The housewarming invitation read something along the lines of 'come help me drink my rum...' We helped a friend move back in January when the wind was whipping around us with cold flurries. And although it's almost close to winter again, her new little home is ready for a party, and she apparently has some rum to share.

I thought she deserved a card and a little present. After all, what is a housewarming without a bit of celebration? This card actually (for once) did not follow any templates at all!


I used Lucky Level 2 embellishments and canvas buttons to help me embellish this lovely card! Strangely enough this became a SOTM card. If you look closely, can you identify the three months featured on this card? If you guessed March, September, and more importantly November you are correct! The stamp of the month for November is called Cherish the Day.


With every purchase over $55 CAD this can be yours for $5.50; which would also qualify you for the Holiday Wishes campaign.

Michaels:
* Cardstock from "Spice Market" set
* Cardstock from "Primary" set

CTMH:
* Grace Level 2 Paper Pack (retired)
* Chairs To You (March SOTM)
* Limited Edition (September SOTM)
* Cherish The Day (November SOTM)
* Cherished Flourishes
* Chocolate Ink
* Cranberry Ink
* Tulip Ink
* Juniper Ink
* Canvas Badge Buttons

Saturday, October 29, 2011

Cats, Spiderwebs, and Holiday Wishes November Campaign

One of my favorite squares that I saved for last is the one below.


Again, I used Cherished Flourishes to dress this one up a bit, used my CTMH corner rounder for rounded corners, and with rhinestones and a pen I created a rhinestone spiderweb. It's so much fun to sometimes freehand in the last little details that you don't otherwise have a stamp for.

Every year since we have moved in and handed out candy, we have had at least one little munchkin look at us like we're going to eat him/her. It's the most adorable look I have ever seen. Let's see if this year proves to be the third year in a row.

After Halloween the next holiday is Christmas! Are you excited yet? I sure am - it's my favorite holiday of the year, and I celebrate it twice. Denmark celebrates it on the 24th, and of course Canada is the 25th. Speaking of holidays, CTMH has decided to gift us with a little something extra.


That's right - with a minimum order of $25 CAD between November 1-30, you can add this cute D-sized stamp set for only 5$! This stamp set normally retails for $19.95. As an added bonus, most of the images in the set coordinate with the Cricut Art Philosphy cartridge.


* Note: Stamp of the Month, K-sized customized name stamps, Cricut® Art Philosophy Collection and Workshop on the Go kits do not count toward a qualifying purchase. Tax and shipping applies.

Trick or Treat!

Thursday, October 27, 2011

Hats and Cats

I am posting the last few cube decorations so I can get them all up on this blog before I hear "trick or treat!!" at my door! I'm saving one for Sunday so that I can put it up then just in time for Halloween.

A little bit of trivia from you, courtesy of Wikipedia: Halloween is linked to the Celtic festival of Samhain, or Summer's End. To be honest, this year has been so gorgeous up to this point that I can hardly believe November is next week.


I'm not sure what inspired this when I made it, but looking at it now it reminds me of the TV show, Sabrina the Teenage Witch. With her sassy black cat on this broom. It was one of my earlier ones, and I actually was experimenting with the red and black embossing powder from CTMH.


I just love the simplicity of these three hats lumped together. The hat in the middle, stamped with Cranberry Ink is raised up with foam tape. I use it all over my projects and I find it just gives my items that extra "oomph!" For the spiders to stand out, I embellished them with rhinestones and for those perfect rounded corners, I used CTMH's corner rounder punch.

Michaels:
* Cardstock, "Spice Market"
* Cardstock, "Gems"

CTMH:
* Bitty Rhinestones
* Wicked
* Red Embossing Powder
* Black Embossing Powder
* Outdoor Denim Ink
* Cranberry Ink
* Smokey Plum Ink
* Moonstruck Ink
* Chocolate Ink

Remember to dress the kids up in bright costumes and arm them with flashlights!

Sunday, October 23, 2011

Rhinestones and Witches

The only thing I don't like about transitioning into Fall and then Winter, is the ensuing sicknesses that always go around every year. I'm still unfortunately sniffling and exhausted and haven't done any new Christmas cards for a while. However, I am moving forward on Mom's Christmas present.

I have another Halloween cube decoration for show! I always have pictures to post, don't worry; and I will take some photos of the calendar when I get a chance. I'm waiting for the oven to warm up so that I can get my chocolate chip cookies in there.


This one required some fancy decoration. I was running out of ideas to use just Wicked (August 2011 SOTM) for the decor. So, Cherished Flourishes gave this one a fancy flourish which was finished off with three little rhinestones. I used Fiskar edger scissors for the "Have a Wicked Halloween" piece, and then distressed it with Chocolate ink. Did I mention how much I love inking up edges with sponges? The witch is also popped up with foam tape.

I also received spray pens, reinker and Pearl Paint in my latest order, and I can't wait to find a good use for them! This is my first time using them, so I thought I'd do a little research and lengthen hopefully the lifetime of the pens. The following video from CTMH is an excellent how-to video for this tool.


I'll be spraying up one of my Christmas cards up really soon! Keep an eye out for it - and in the meantime enjoy the cube decorations.

CTMH:
* Wicked (August 2011 SOTM)
* Cherished Flourishes
* Olive Ink
* Outdoor Denim
* Black Embossing Powder

Michaels:
* Embossing Ink (from the old days before I discovered CTMH)
* Cardstock from 'Gems' and 'Spice Market' sets
* Rhinestones

Only a few more days till' All Hallows Eve,

Thursday, October 20, 2011

Wizard of Oz, anyone?

I have actually been sick as well as in all day training this week, so I have come home and straight to bed. Thus, no new cards to post about today, but I need to get started on Mom's calendar.

However, I did promise to slowly put up the cube decorations, so today's post is another one of them! The ribbon was actually sourced off a bag of Christmas goodies from last year. So let this be a tip to you - if you're feeling frugal, all those ribbons and bows off gifts can go to good use!


Strangely enough this reminds me of the Wizard of Oz, but I have no idea why. My favorite part about this one, other than the stockings sticking out is that I created a lattice with the border stamp that turned out really well! And finally, thanks to Carla for sourcing this amazing tip for stamping (from fancyMelissa) - so amazing that I just had to repost it here too.


Michaels:
* Cardstock from "Gems" set
* Cardstock from "Primary" set
* Gold Brads

CTMH:
* Wicked (August 2011 Stamp of the Month)


Saturday, October 15, 2011

Our memories keep us warm...

Sometimes I end up with a stamp set that I like, but have no idea how I want to use it. Snow Days in the latest catalogue was one of those. However, it ended up featuring on this latest card inspired by one of Got Sketch?'s Anniversary posts : Sketch 79.


As you can see, more of the cut out nissers I had featured once again on this card. I don't remember what colors I used to color the elf, but I wanted his little lightbulb string to stand out a little. So I added a little liquid glass to each little lightbulb. It's neat stuff but takes a little while to dry.


Here's a close up - look closely! - of the liquid glass on the lightbulbs. The red one by his right foot shows the liquid glass clearly. To raise him up I used foam squares, also available in a spool from CTMH.


Finally, to finish off the card I created the inside; using a touch of red to match the red cardstock on the front of the card. I find that flourishes from various sets really help give it a little oomph and a nice surprise when the recipient opens the card.

Michaels:
* Jewel Cardstock set
* Gems Cardstock set
* Ribbon
* Rhinestones

CTMH:
* A Timber
* Snow Days
* Merry Pursuits
* Snow Flurries
* Festive Thoughts
* Liquid Glass
* Desert Sand Ink
* Olive Ink
* Cranberry Ink