... what I love about making cards for the family that isn't part of my annual workshop, is that I can use any stamp set which is Christmas based to make them. I have a few favorites that were part of catalogues past.
This one was no exception. I whipped out a mix of snowflakes and cute ornaments, my silver emboss powder and just went to town.
Today's inspiration: http://www.splitcoaststampers.com/gallery/photo/2320958
On the front I combined old and new stamps. Swirls Around provided the main swirly and the old snowflakes from the Winter 2011/2012 catalog was the perfect background. The best pop is the Cranberry Baker's Twine.
I brought a swirl from the same set up the right hand side of the cardstock inside the card and used the sentiment from the same set as the ornaments.
Last but not least is the November Stamp of the Month: Illuminate!!
Other:
Solid cardstock (kraft & white)
CTMH:
Swirls Around
Snowflakes
Holiday Cheer
Ponderosa Pine Ink
Topiary Ink
Olive Ink
Cranberry Ink
Cranberry Baker's Twine
Silver embossing powder
Opaque Pearls - Black/Grey
Adhesive Rhinestones - Blue/Green
Itty Bitty Rhinestones
The first of many Xmas cards to come!!
Showing posts with label snowflakes. Show all posts
Saturday, November 23, 2013
Sunday, November 18, 2012
Cricut Snowflakes
When I was cutting out snowflakes for my workshop, I noticed that there were several other snowflake shapes that are available in the Art Philosophy cartridge. I couldn't resist using them for this latest Christmas card.
Today's inspiration: http://tenealewilliams.com.au/2012/11/case-study-116/
I added two little star brads for the middle of two of the snowflakes, and finished it off with a little blue rhinestone in the middle of the third snowflake.
I thought I'd use the sentiment from October's stamp of the month which is a perfect partner to the snowflakes from the Snowflakes set. I also distressed the edges of the cardstock on both front and back with Indian Corn Blue Ink.
My Stash:
* Dark Green cardstock - Spice Market
* Background white paper (CM)
* Star brads
CTMH:
* Art Philosophy Cricut Cartridge
* Very Merry Christmas - Oct 2012 SOTM
* Artiste Birthday set
* Blue Adhesive Rhinestones
* Snowflakes
* Indian Corn Blue Ink
* Sky Ink
I'm less than a week away from the second workshop and cannot wait!
Today's inspiration: http://tenealewilliams.com.au/2012/11/case-study-116/
I added two little star brads for the middle of two of the snowflakes, and finished it off with a little blue rhinestone in the middle of the third snowflake.
I thought I'd use the sentiment from October's stamp of the month which is a perfect partner to the snowflakes from the Snowflakes set. I also distressed the edges of the cardstock on both front and back with Indian Corn Blue Ink.
My Stash:
* Dark Green cardstock - Spice Market
* Background white paper (CM)
* Star brads
CTMH:
* Art Philosophy Cricut Cartridge
* Very Merry Christmas - Oct 2012 SOTM
* Artiste Birthday set
* Blue Adhesive Rhinestones
* Snowflakes
* Indian Corn Blue Ink
* Sky Ink
I'm less than a week away from the second workshop and cannot wait!
Friday, September 21, 2012
Sometimes inspiration is hard to pass up.
I was browsing some type of social media at the time (either Pinterest, or Facebook) and I ran into this unbelievably gorgeous card. And I just absolutely had to borrow it.
Today's lucky find is from Erin Taylor, for Papertrey Ink's Make it Monday #83.
Of course I'm on a Christmas kick now, and my favorite color combination is red and silver. So much that these were actually my wedding colors four years ago! I stamped the tree, snowflakes, and sentiment in embossing ink, and then used silver embossing powder plus a couple of gemstones to jazz up the tree. If you look closely there are snowflakes from two separate stamp sets in the cluster.
For something new, this time I reversed the colors and instead stamped with Cranberry Ink on white. Again, if you look closely - snowflakes from two different sets. It's about this time of year that I dig out all the Christmas sets I've bought since I started collecting CTMH, and I like to give some oldies a whirl amid the new sets that are available in the current catalog.
I am offering Christmas card workshops this year! Cards are $1.50 each to make and come with their own envelopes. The dates available are October 27th, November 3rd, and November 24th. If you want a card creating party of your own let me know and we can set something else up! Designs are currently in the works and will be posted once complete.
Michaels, etc:
* Solid cardstock - Jewel Collection
* Solid cardstock - Primary Collection
* Rhinestones
* Silver embossing powder
* Embossing Ink
CTMH:
* Snowflakes
* Card Chatter - Christmas
* Holiday Warmth (retired)
* Cranberry Ink
I'm still enjoying what's left of summer!
Today's lucky find is from Erin Taylor, for Papertrey Ink's Make it Monday #83.
Of course I'm on a Christmas kick now, and my favorite color combination is red and silver. So much that these were actually my wedding colors four years ago! I stamped the tree, snowflakes, and sentiment in embossing ink, and then used silver embossing powder plus a couple of gemstones to jazz up the tree. If you look closely there are snowflakes from two separate stamp sets in the cluster.
For something new, this time I reversed the colors and instead stamped with Cranberry Ink on white. Again, if you look closely - snowflakes from two different sets. It's about this time of year that I dig out all the Christmas sets I've bought since I started collecting CTMH, and I like to give some oldies a whirl amid the new sets that are available in the current catalog.
I am offering Christmas card workshops this year! Cards are $1.50 each to make and come with their own envelopes. The dates available are October 27th, November 3rd, and November 24th. If you want a card creating party of your own let me know and we can set something else up! Designs are currently in the works and will be posted once complete.
Michaels, etc:
* Solid cardstock - Jewel Collection
* Solid cardstock - Primary Collection
* Rhinestones
* Silver embossing powder
* Embossing Ink
CTMH:
* Snowflakes
* Card Chatter - Christmas
* Holiday Warmth (retired)
* Cranberry Ink
I'm still enjoying what's left of summer!
Saturday, September 15, 2012
Winter's comin...
This feels like the last weekend of Indian summer, but I won't complain. With that fades into fall and then winter, and with winter comes Christmas!!
I did it - I have since made my first Christmas card of the year as I am thinking Christmas card workshops for October and November while we're still in September. I'm super pumped to do them - nothing beats a little wine, some munchies, and good company.
Today's inspiration is courtesy of Case Study: Case Study Challenge #95 based off Teneale's version.
Those dots look familiar, don't they - they're off the double sided stamp set featured in this month's promotion for National Stamping Month! And, I used the newest craze of "swiping" to give it a bit of texture. It doesn't show very well, but I used liquid glass to pop up the middle of the snowflakes and broke out my CTMH waterbrush to color in the little raccoon. He's colored with Grey Wool (retired), Barn Red, Blush and Pondorosa Pine.
I brought the blue inside the card and again used liquid glass for the middle of all those snowflakes. My favorite thing about liquid glass is that it takes on whatever color it's sitting on top of and it doubles as an adhesive if you have lost the adhesive backing on some of the smaller adhesive gems/pearls.
It would be fitting to enter my first Christmas card of the year into H2H's Christmas challenge!
Michaels, etc:
* Solid cardstock
* Ribbon
* Embroidery floss
CTMH:
* Snowflakes
* Bundled Buddies (retired)
* Pink/Red Adhesive Gems
* Opaque Adhesive Pearls
* Bling Assortment
* Liquid Glass
* Cricut Art Philosopy Cartridge
* Water brush
Designs for the workshop are well in progress!
I did it - I have since made my first Christmas card of the year as I am thinking Christmas card workshops for October and November while we're still in September. I'm super pumped to do them - nothing beats a little wine, some munchies, and good company.
Today's inspiration is courtesy of Case Study: Case Study Challenge #95 based off Teneale's version.
Those dots look familiar, don't they - they're off the double sided stamp set featured in this month's promotion for National Stamping Month! And, I used the newest craze of "swiping" to give it a bit of texture. It doesn't show very well, but I used liquid glass to pop up the middle of the snowflakes and broke out my CTMH waterbrush to color in the little raccoon. He's colored with Grey Wool (retired), Barn Red, Blush and Pondorosa Pine.
I brought the blue inside the card and again used liquid glass for the middle of all those snowflakes. My favorite thing about liquid glass is that it takes on whatever color it's sitting on top of and it doubles as an adhesive if you have lost the adhesive backing on some of the smaller adhesive gems/pearls.
It would be fitting to enter my first Christmas card of the year into H2H's Christmas challenge!
Michaels, etc:
* Solid cardstock
* Ribbon
* Embroidery floss
CTMH:
* Snowflakes
* Bundled Buddies (retired)
* Pink/Red Adhesive Gems
* Opaque Adhesive Pearls
* Bling Assortment
* Liquid Glass
* Cricut Art Philosopy Cartridge
* Water brush
Designs for the workshop are well in progress!
Sunday, December 4, 2011
Wishes - Greeting Card Workshop
Jeanette Lynton has published two amazing books for cardmaking : Originals and Wishes. These books contain awesome layouts, tips and tricks, recipes on how to make them, and even printable templates on a CD! You can't get any better than that.
I thought I'd try out one of the card workshops in Wishes - Greeting Card Workshop found on page 111. These workshops make 16 standard 5 1/2 x 4 1/4 cards. It took me a total of three hours to finish the workshop, but most of the time was spent cutting. On average, the cards you see in my posts are an hour to make or more including fiddling, color coordination, and cutting/stamping/assembly.
I ended up with 16 beautiful cards which are much simpler than my usual style. I couldn't resist using foam squares though.
The biggest tip of all is: "keep it affordable by stamping your embellishments instead of using consumable accents". It's a great tip for those just starting out.
3 sheets of 12 x 12 paper and 9 pieces of 8 1/2 x 11 white paper for cardstock... plus additional embellishments and a few stamp sets later and voila!
Michaels:
* Cardstock, "White"
* Green cardstock
* Cardstock, "Gems" collection
CTMH:
* Holiday Warmth - October 2009 Stamp of the Month, retired
* Snowflakes
* Festive Thoughts
* Holiday Commentary
* Mistletoe Level 2 Paper Pack - retired
* Snow Flurries
* Bundled Buddies
* Cranberry Ink
* Ponderosa Pine Ink
* Art Philosophy Cricut cartridge
Christmas is fast approaching! P.S ... did you see the card I made with Mad About You (Dec 2011 SOTM) in the previous post?
I thought I'd try out one of the card workshops in Wishes - Greeting Card Workshop found on page 111. These workshops make 16 standard 5 1/2 x 4 1/4 cards. It took me a total of three hours to finish the workshop, but most of the time was spent cutting. On average, the cards you see in my posts are an hour to make or more including fiddling, color coordination, and cutting/stamping/assembly.
I ended up with 16 beautiful cards which are much simpler than my usual style. I couldn't resist using foam squares though.
The biggest tip of all is: "keep it affordable by stamping your embellishments instead of using consumable accents". It's a great tip for those just starting out.
3 sheets of 12 x 12 paper and 9 pieces of 8 1/2 x 11 white paper for cardstock... plus additional embellishments and a few stamp sets later and voila!
Michaels:
* Cardstock, "White"
* Green cardstock
* Cardstock, "Gems" collection
CTMH:
* Holiday Warmth - October 2009 Stamp of the Month, retired
* Snowflakes
* Festive Thoughts
* Holiday Commentary
* Mistletoe Level 2 Paper Pack - retired
* Snow Flurries
* Bundled Buddies
* Cranberry Ink
* Ponderosa Pine Ink
* Art Philosophy Cricut cartridge
Christmas is fast approaching! P.S ... did you see the card I made with Mad About You (Dec 2011 SOTM) in the previous post?
Saturday, November 12, 2011
Ryan's Well - Charitable Contribution
In discussion last week a friend of mine was wondering if I could donate my time and some handmade goods. She is championing the cause of Ryan's Well, and was I interested in donating my time and some cards for her to sell towards raising funds for this? Of course.
For those of you who are not familiar with Ryan's Well, it all started with a 7 year old boy who was moved to help those who did not have access to clean water to drink. He got to work and soon had the first well built in 1999 at a school in a Ugandan village. To this day, his foundation continues to bring clean water and sanitation to those impacted by the global water and sanitation crisis. Can you imagine not having clean water? It's one of the most basic necessities of life. To learn more, click on http://www.ryanswell.ca/
So, I will be having her over tomorrow for a day of gossiping, laughter, homemade pizza and wine along with creating 10 sets of four handmade Christmas cards for sale. They are below:
The left photo is how they will look before going into a Ziploc bag and the right is all the cards that make up a set. Thanks to the following blogs and sketches for inspiration: SplitcoastStampers.com : VLVNov2011; Random Acts of Creativity : Challenge #36; Heart 2 Heart Close To My Heart Challenge Blog : H2H76; and finally, Mojo Monday : MOJO 214
The biggest challenge for me was to keep it to cardstock and stamps. It was a self imposed challenge to see if I could break away from the dependency on pattern cardstock. I wanted to showcase the different layers here, and the blue border was punched with a EK snowflake edger punch from Michael's. This one was from Random Acts of Creativity 's template, but instead of a big bow I opted for a tiny green tie.
This last one from SplitcoastStampers.com highlights one of the major perks about working with acrylic stamps: you can bend them (but be gentle!) to follow curves and other funky shapes depending on what you're stamping on. I again lifted up the three ornaments from the set December 25 and curved the love-hope-peace sentiment from Snow Flurries. The blue snowflake that was cut out again by hand is better done with the corresponding shape in the Art Philosophy Cartridge.
I hope these four cards are charming enough to bring in some $$ for Ryan's Well - wish my friend luck!
Michaels:
* Mounting foam tape
* Cardstock from 'Spice Market'
* Cardstock from 'Gems'
* Cardstock from 'Primary"
* Rhinestones
CTMH:
* Snowflakes
* You and Me
* A Sip
* Pair A Phrase
* Festive Thoughts
* Holiday Cheer
* Snow Days
* December 25th
* Snow Flurries
* Silver Glitter Gel
* Liquid Applique
* Chocolate Ink
* Cranberry Ink
* Moonstruck Ink
* Ponderosa Pine Ink
* Olive Ink
For those of you who are not familiar with Ryan's Well, it all started with a 7 year old boy who was moved to help those who did not have access to clean water to drink. He got to work and soon had the first well built in 1999 at a school in a Ugandan village. To this day, his foundation continues to bring clean water and sanitation to those impacted by the global water and sanitation crisis. Can you imagine not having clean water? It's one of the most basic necessities of life. To learn more, click on http://www.ryanswell.ca/
So, I will be having her over tomorrow for a day of gossiping, laughter, homemade pizza and wine along with creating 10 sets of four handmade Christmas cards for sale. They are below:
The left photo is how they will look before going into a Ziploc bag and the right is all the cards that make up a set. Thanks to the following blogs and sketches for inspiration: SplitcoastStampers.com : VLVNov2011; Random Acts of Creativity : Challenge #36; Heart 2 Heart Close To My Heart Challenge Blog : H2H76; and finally, Mojo Monday : MOJO 214
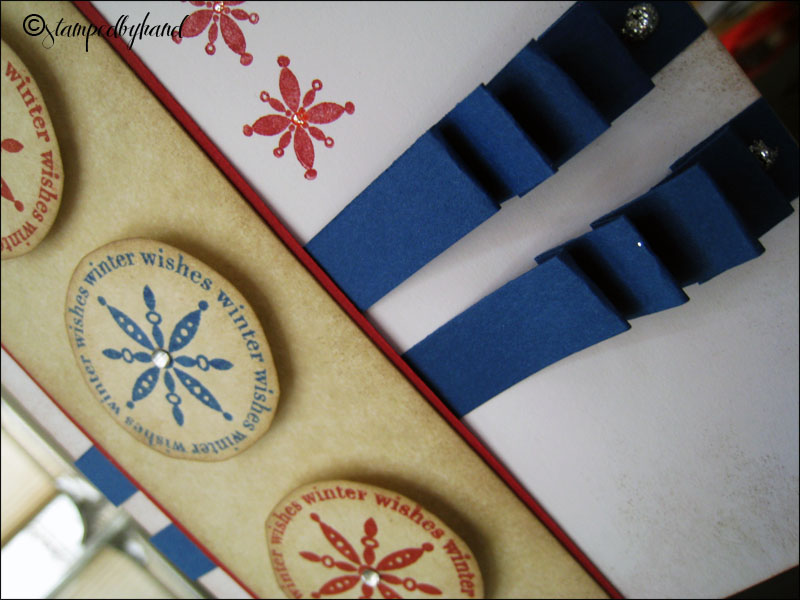
I elected to keep this one simple using the layout from Heart 2 Heart Close To My Heart Challenge Blog. The technique featured here is paper ribbons; I fold them to get a neat accordion effect and I put a dollop of CTMH's silver sparkle gel to make it look like brads. The circles are raised up and I added a rhinestone to the middle of each. CTMH's Art Philosophy cartridge has a corresponding shape to the circles from the set December 25, but I'm hoping for a Cricut for Xmas and thus they were hand-cut.
I dressed up the red piece with a Merry Christmas sentiment. Using the layout from Mojo Monday - MOJO214 instead of a flower I stacked three different ornaments from the set Holiday Cheer.with mounting foam tape. It's a bit slimmer than the usual foam squares. And finally, to highlight the snow I used Liquid Applique to outline the roofs and snow in the trees, then embossed it for a poofy look.
I hope these four cards are charming enough to bring in some $$ for Ryan's Well - wish my friend luck!
Michaels:
* Mounting foam tape
* Cardstock from 'Spice Market'
* Cardstock from 'Gems'
* Cardstock from 'Primary"
* Rhinestones
CTMH:
* Snowflakes
* You and Me
* A Sip
* Pair A Phrase
* Festive Thoughts
* Holiday Cheer
* Snow Days
* December 25th
* Snow Flurries
* Silver Glitter Gel
* Liquid Applique
* Chocolate Ink
* Cranberry Ink
* Moonstruck Ink
* Ponderosa Pine Ink
* Olive Ink
Friday, November 4, 2011
Stitching on cards
In one of my previous orders I had purchased the awesome new ruler from CTMH. It has holes in it so first you pierce where the holes are, then you sew through them! How cool is that? So I thought I'd do that for this card.
The inspiration comes from Mojo Monday: MOJO 212.
Not only did I use the same floss for stitching, I also used it for the ribbon on the front. However, the threading is two strands and the cross ribbon is all six. The snowflake is from a set of Xmas buttons that I found at Michaels' while walking through. All their Xmas stuff is now out for sale.
The inside of the card was stamped with two shades of green and using the second generation stamping technique. After inking, stamp a good image on scrap paper, then without reinking stamp on your project again. Between that and the different shades of green, my second snowflake stood out really well.
Michaels:
* Cardstock from "Gems" set
* Cardstock from "Spice Market" set
CTMH:
* Snow Flurries
* Snow Flakes
* A Timber
* Holiday Cheer
* Bitty Rhinestones
* Olive Ink
* Cranberry Ink
* Honey Ink
* Piercing Kit
* Ruler
Happy Stamping,
The inspiration comes from Mojo Monday: MOJO 212.
Not only did I use the same floss for stitching, I also used it for the ribbon on the front. However, the threading is two strands and the cross ribbon is all six. The snowflake is from a set of Xmas buttons that I found at Michaels' while walking through. All their Xmas stuff is now out for sale.
The inside of the card was stamped with two shades of green and using the second generation stamping technique. After inking, stamp a good image on scrap paper, then without reinking stamp on your project again. Between that and the different shades of green, my second snowflake stood out really well.
Michaels:
* Cardstock from "Gems" set
* Cardstock from "Spice Market" set
CTMH:
* Snow Flurries
* Snow Flakes
* A Timber
* Holiday Cheer
* Bitty Rhinestones
* Olive Ink
* Cranberry Ink
* Honey Ink
* Piercing Kit
* Ruler
Happy Stamping,
Labels:
a timber,
card,
holiday cheer,
sketch,
snow flurries,
snowflakes,
xmas
Subscribe to:
Posts (Atom)